 AYINO Technology Co., Ltd.


【HDMI 2.1 Switcher Four In One Out 】 High-quality aluminum alloy housing HDMI switcher easily enables video and audio from 4 different HDMI device sources to 1 HDMI display with no lag, no flash or resolution drop. It frees you from plugging and unplugging your HDMI cable and allows you to easily enjoy work and play time, switching between 4 devices with the touch of a button or remote control.
【8K Ultra HD Resolution 】 supports 8K@60Hz, 4K@120Hz, and 1080P@240Hz resolutions, providing you with up to 48Gbps transfer rates, downward compatible with all previous HDMI standards. Tips: If you need to output 8K@60Hz and 4K@120Hz, we recommend the use of high-quality HDMI 2.1 standard HDMI cable.
Plug and Play Switch signals between four HDMI device sources with the press of a button or remote control. The LED indicator visually shows which input port is active.
★ When connected to a power supply or display, use a Type-C USB cable and a 5V USB power adapter to power the product. For 8K resolution, the length of the HDMI cable connecting the two ends of the switch should not exceed 3 meters. Note: For some high-power devices, switching the signal source manually may take 3-6 seconds to synchronize the display. If the screen fails to display, check whether the power supply is normal.
8K@60Hz HDMI 2.1 switcher uses the latest chip, aluminum alloy material, anti-corrosion structure, but also can resist overheating or fracture, more durable and practical. The HDMI 2.1 switcher supports most devices with standard HDMI ports. Compatible with computer, Macbook, Xbox 360, Xbox One, PS5/4, Blu-ray DVD, Nintendo Switch, etc. Hd or full HD TV, Apple TV, Blu-ray DVD, projector, monitor, etc.
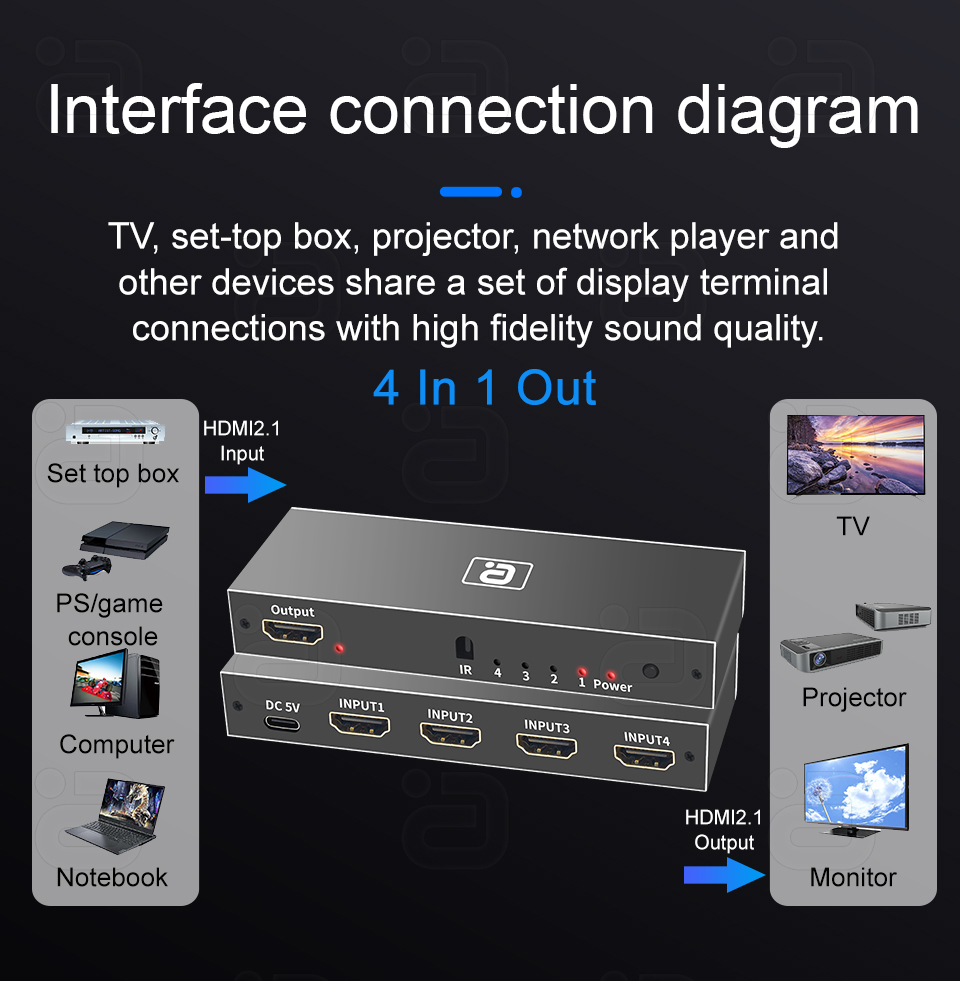
Connection description:
1. Connect the HD signal source to the HDMI INPUT port of the switch using an HDMI cable.
2. Connect the OUTPUT of the switcher to the display terminal using an HDMI cable.
3. Connect the standard DC 5V power adapter to the DC power input port of the device, and power on the device.
4. Press the “Switch” button on the device or the “1” or “2” or “3” or “4” button on the remote control to select the signal source you need.
Accessories:
8K HDMI 2.1 Switch 4 In 1 out x 1,
Remote control x 1
5V power adapter x 1,
Power cable x 1
Overall dimensions:
Length * Width * Height :121.5*48*19(mm)
Note:
Please use correctly and maintain properly to ensure product performance and normal operation.
Keep away from humid, high temperature, dusty, corrosive and oxidizing gas environment to avoid damage.
All components should avoid strong vibration, collision, knock, fall, so as to avoid damage.
Do not touch the power adapter plug with wet hands
When unplugging the adapter from the electrical outlet, hold the plug and do not pull the power cord.
Please turn off the power when the machine is not in use (please unplug the power adapter when it is not in use for a long time)
Do not open the cover and do not touch any device in the machine.
Must use the power adapter provided or approved by the manufacturer (5V 1A)
Before powering on the power, carefully check whether the connection line is normal and ensure that all interfaces are properly connected. Common troubleshooting methods are as follows:
Fault causes and solutions
1 No power
1. Check whether the signal source is correctly connected
2. Check whether the signal source is turned on
2 No image
1. Make sure that the TV is turned on and connected to the machine
2. Check whether the input signal source is on and properly connected
3. Check the connection status of the system
4. Check whether the connection cable is in good condition
5, cable quality (HDMI cable requirements meet HDMI standards)
3 Image blur
1. Reconnect the connecting port to prevent poor contact of the socket interface
2, cable quality (HDMI cable requirements meet HDMI standards)
4 No Sound
1. Confirm whether the display device supports sound output.
2. Check whether the connection line is in good condition
3. Reconnect the connecting port to prevent poor contact of the socket interface
4. Confirm whether the output audio format is correct.


您好!Please login